Background

Monday, July 11, 2016

Finish Along Q3


This is a first Finish Along link for me so I'm excited to join in the fun.  I'm hoping this will push me to get some of these projects finished!

One of which is a very long WIP.  I pulled it back out recently and did some more work on it but then decided I needed another row.  So...I folded it back up and put it back on the shelf.
 I recently started a Swoon quilt.  I had the fabric on a shelf and couldn't decide what I wanted to do with it.  A few months ago, I bought the Swoon pattern from Thimble Blossoms but didn't know which fabric I wanted to use.  Finally, this summer I merged the two and I'm loving the result so far.
Another hopeful finish is my Corey Yoder, Prairie quilt.  I bought a layer cake and decided to do a scrappy hour glass quilt.  I think it will be cute once I get it together and put some borders on it.
These three runners in finishes are all I think I can accomplish in three months.  Between the quilt alongs and swaps and orders I have, I hope to get these babies complete!
Finish A Long 2016

Sunday, July 10, 2016

Sporty Quilt


I finished this quilt last week and I'm a little behind and lazy on my blog.  A friend of mine asked if I would make a quilt for her son.  She said she wanted a sport quilt and she couldn't find one that she really liked.  They all seemed to be geared towards one sport or another.  She wanted it for his bed.

This was my largest quilt to make so far and I had a lot of fun doing it.  I used the pattern 4 Square Fun from Sweet Treasures Quilts.  This was the second time I've used this pattern because it comes together so nicely and I really love it for boy quilts.

I took it to my LQS to rent time on their long arm machine to quilt it.  A few months ago I ordered a pantograph to use because I'm just not that skilled on the long arm.  I used one that is called Chain Maille from Willow Leaf Studio.  I thought it might look like baseballs on this quilt.
It took me pretty much all day to quilt the thing!  I got to the shop at 10:30 and didn't leave until after 5:00.  I felt like I was an employee there.  People were watching me, commenting on the quilt, asking me questions.  I said I wasn't skilled and I'm really not skilled!  I had sewn two rows and realized the bobbin was in wrong and I messed up the thread in the threader so needless to say, I had to unstitch (mindlessly pick) two rows and then resew them.  But after it was all done, I thought it looked fabulous!
My friend posted a picture of the quilt on his bed and said how much he loved it.  Enough reward for me! (and of course, all the nice comments people posted)
 I almost left out the most hilarious part.  I really wished I had captured it on camera but I wasn't that quick.  I made Carter go to the football field at his high school to take pictures of the quilt.  It was a pretty windy day too.  He had to get it over the fence for me because I'm too short.  But the funny part is as I took the last photo someone drove through the parking lot and tooted their horn at us.  Carter groaned "Mom!" and wadded up the quilt.  He was so embarrassed about it.  Ahh, the troubles of having a quilting mom.


Sunday, June 19, 2016

New Quilt Bloggers Blog Hop 2016

Hi, welcome to week 2 of the New Quilt Bloggers Blog Hop!  I'm Jaime and happy to be a part of this event with so many other talented quilt bloggers.

Once upon a time, a little girl lived in a small town.  Ha! No, really. I grew up and now I'm a mom, taxi driver, chef, and counselor to my teenage son, Carter. Being a single mom, he keeps me pretty busy and sometimes gets in the way of my quilting. Lol!

I also teach in that same small town.  Everyone knows everyone (and your business) and I teach children of friends that I grew up with. I'm currently changing grade levels, from teaching first grade to fourth grade next year.  From "don't pick your nose" to "maybe you should start wearing deodorant." I'm looking forward to the new change, it keeps me fresh.

My mom taught me to sew at a very young age.  She likes that I give her the credit. I used to sew some of my own outfits when I was in high school.  A few years ago, I ventured out into the quilting world.  I thought I would like to try it out, it seemed like a challenge.  I made my first quilt following the instructions on a tutorial and lots of YouTube videos.

I would love to say "I was hooked," but it was probably another year before I decided to try it again. But I did...and again and again and again. I was reading all these blogs about quilting so I decided to blog about it.  I love that it gives me a way to share what I'm doing.

If you blog, or are thinking about blogging, my suggestion to you is to keep a schedule.  This is my own suggestion to myself and thought I would share. Lol!  Keeping up with regular posts can seem daunting.  But if you set yourself a day or two each week to post, maybe it won't seem so scary and mind-boggling of what to write about.  We will see how that works out for me.

Back to quilt talk...one of my favorite quilts is Carter's Texas A&M Aggie quilt.  My two brothers and I graduated from there. Whoop! We are an Aggie family and Carter knows no different.  He wanted A&M bedding so I made him a quilt for Christmas.
It gets the most use out of all the quilts I've made.  Even my dog, Penny loves it.
My quilt patterns that I have sewn are pretty basic.  My skills are getting better (at least I think) and I have made some quilts that I have to say I'm proud of.  One is a throw quilt.  This one was quilted on a long-arm machine and that was fun learning how to do that.  I don't own a long-arm (only in my quilting dreams), but I rent time at my local quilt shop.  I had to have someone nearly hold my hand through the process but one I definitely want to repeat.

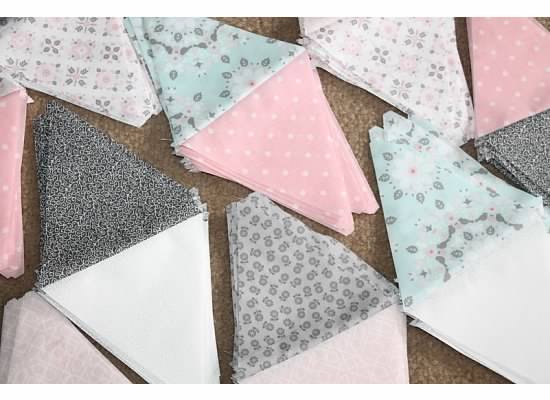
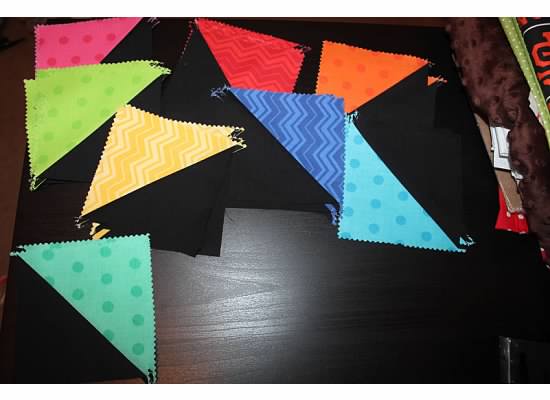
Another one of my favorites is a baby quilt.  This is a favorite because I love triangle quilts and the colors of this quilt are just fun, trendy and beautiful.
My mom and I still sew together.  We make some quilts tops together and she calls herself the "worker bee" because she thinks she just takes directions from me.  But we also sew baby bedding together. 
I've lived in this small town of mine my whole life.  My family is here.  My roots are here.  My heart is here.  It's home.  Small Town Stitchin' just seemed right when we started sewing and I started blogging.  I hope it just keeps growing.  I hope to one day design my own fabric.  I'm working on learning that process but it is a slow and very steep learning curve for me.  For now, my immediate goal is to increase the difficulty of my piecing and keep blogging about it. 

My Question for You:

My favorite part of the quilting process is piecing the top.
My least favorite part is the cutting.  
What about you?  What are your favorites and least favorite parts of the process?

For more blogging fun you should hop on over to some others that are posting on this blog hop with me:

Jennifer @ Inquiring Quilter
Abigail @ Cut & Alter

And don't forget to enter for some fun giveaways over at Meadow Mist Designs.  Cheryl is one of the great masterminds and organizers behind our blog hop.

Check back soon for a finished quilt that is all boy!

Saturday, May 28, 2016

Learning Fabric Design

Today I started an online course to learn about fabric design.  I've just started it so I can't rate it yet but I think it's going to be a steep learning curve.  I haven't worked with Adobe Illustrator, so there's that too.  I'm really excited about learning something new.  This will be one of my many summertime projects.  I'm getting ready to submit my first assignment.  Kind of fun to say that again. :)

Friday, May 27, 2016

Baby Baseball

I had so much fun picking out the fabric for this quilt.  My cousin is having a baby boy in July and the daddy-to-be is a big baseball fan.  I used the Four Square Fun by Teri Staats for Sweet Treasures. 
It's funny, we hope our kids will have similar interests with us.  I remember when my son was born I had all kinds of baseball outfits and baseball toys.  I forced him to play baseball for 3 years and he hated it.  Now he has absolutely no common interests with me, he's a 15-year-old boy, fast cars, gaming, girls...the order of importance varies each hour.

Now let's hope this baby likes baseball...or it doesn't matter yet since mommy and daddy will decide for him for the first few years.
I quilted with a diagonal straight line stitch with red thread.  The backing is the navy baseball fabric.

Tuesday, May 3, 2016

Planner Stickers

I love decorating my planner with stickers but what's even better is decorating it with FREE stickers. I love the work Jessica does on myplannerenvy.com and she shares her work.   A couple weeks ago, she shared a new sample of stickers...SEWING stickers!
I took a picture of the stickers I printed so I could show you the fun work she shares but hop over to her page and see for yourself.  Lots of cuteness!

Sunday, April 10, 2016

Diamonds are Rough!

I got a request to make a man quilt for a friend's husband.  She wants to give it to him for his birthday.  First, a manly pattern is hard to choose.  Also, finding MAN fabric is not easy.  My friend said "Maybe some brown and cream, a little blues..."  I have seen pictures of the diamond quilts and thought that could be "manly."  Then off to the fabric store.  Ummm... polka dots are not manly.  And do you know how many fabrics don't have some type of flower or swirl or vine...narrows down the choices.
I matched up the edges and sewed.  Fail!  So I unstitched and searched for how to overlap the edges. That was a real struggle.  I'm still not sure I have the easiest technique out there.  I sewed the diamonds together to make rows.
So I feel like I'm on a roll and now it's time to sew the rows together.  Screech! Struggle #2! I lined up the seams and sewed.  Simple.  Right?  Wrong!  They did not line up.  Not even close!  So I did some more searching online and found a tip on putting a pin through the seams.  I measured 1/4" in from the edge and then put the pin through the seam.  It worked!  Time consuming.  Meticulous. Perfection!
Finished product coming soon!  I hope...


UPDATE: Finished it and my friend loved it.  She couldn't wait to give it to her husband and gave it to him early.


Tuesday, March 29, 2016

Baby Clothes Quilt


A friend of mine brought me a bag of baby clothes and asked if I would make a quilt from them.  She decided that she just wanted a basic squares patchwork.  I was a little skeptical of how it would turn out but it looks precious and she loves it.  There are onesies, dresses, bibs and blankets in this quilt.


We added some white sashing strips in between rows so that it would not stretch or grow after it's loved on for a while.  We also backed most of the pieces with fusible interfacing.


We tried to get as much of the textures as we could.  You can see some ruffles and pockets on some of the squares.  Overall, a fun and absolutely adorable quilt.  I like when people push me on my thinking.

Friday, March 25, 2016

An Easter Pillow

I finished up this pillow with not much time for display but I'll have it for next year.  I think it turned out pretty cute.  I used the same directions as the Valentine's Day pillow post.  I just backed it with a natural color linen.  

I think I need to work on my embroidery stitching but not too shabby.


Thursday, March 24, 2016

A Baby Triangle Quilt

This was such a pretty quilt to make.  The fabrics made it seem so dainty for a little baby girl.  We had a baby shower and we needed something quick but I wanted it to not look like a "quick" quilt.  I love how this turned out.
First, I decided to make the triangles six inches.  I thought this size would show off the fabric best.  I began cutting the fabrics into 6" x WOF strips.  I sewed them strips together down both long sides of the fabric.
Then it was time for cutting.  I lined my isosceles triangle ruler up with the point on one edge of the fabric and the 6" line on the other.  I continued down the strip, rotating my ruler.
Unstitch the few stitches at the point of each set of triangles.  Press open and continue until you have lots of triangles.
After all the seams are pressed on the triangles.  You can begin to lay out your pattern.  You will sew the rows diagonally.  The picture below has the different stages.  The row farthest to the right are the triangle sets laid out to be sewn together.  The row next to it has been sewn together and then the next section is what it will look like once you sew two rows together.  You will need to unstitch or cut some single triangles to fill the the top and bottom rows of the quilt. When cutting the sides of the quilt, I lined my ruler up with the points of the triangles and cut them down the center.


My son is tall enough to be a great model for quilts.  There is a lot of groaning going on behind that quilt even though the clouds make it seem beautiful.


When I quilted it, I used the edge of my presser foot as a guide and sewed down both sides of the seams on the triangles. This is the design on the back and the beautiful backing fabric that was my main fabric of inspiration.
The mommy-to-be was in love with the quilt.  That's exactly what I hoped for!


Monday, January 11, 2016

Some More Love Day Decor

This week we started a "Dump the Plump" challenge at my school.  It kind of copies the Biggest Loser show but we wanted to set our own rules.  It HAS to be fun to get us teachers to participate.   So the weekend was a horrible start, I mean who goes to the grocery store to buy healthy food but then drives through an unnamed fast food restaurant after?  But back on it today and pretty much hungry all day. My team probably doesn't have a chance at winning this competition.  I'm one of the those "lose weight for swimsuit season and gain it for sweater season" kind of people...but I'm also very competitive.

Right now I'm thinking of sweets which leads to "Love Day."  I finally finished up that pillow that I started over Christmas break.  The lace was a no-go but I think the poms-poms fit it perfectly.
Click HERE for the tutorial for this pillow.

I also made some placemats.  My house could use a little more love with a teenage son...or maybe not...he recently acquired a girlfriend.  Yikes!  These are pretty fun to make.  I used duck cloth on one side and outdoor canvas fabric on the other side.  I'm sure you could use duck cloth on both.  They have such cute prints in this kind of fabric.  I already spotted some more I want to buy and make more of these.
First I cut fusible interfacing to to iron on the back of the top piece.  Then I sewed all the way around at 1/4" with right sides together leaving an opening big enough to flip right side out.  I then ironed all the seams flat.  This was probably the hardest and most painful part of the whole project (my poor fingers).
Once they were flat, and the opening folded and pressed flat also, I top-stitched around again and making sure I caught the opening in my stitch.
After that, I cut out the heart backed with Heat N Bond and stitched a satin stitch around.  For more directions on this go to my A Valentine's Day Applique post.
Here is what the back side looks like.  I like that it can be flipped over and still look cute.
I even started on another project this weekend.  A while back I bought a couple of charm packs just because I liked the colorful fabric in them.  I still haven't completely decided what my pattern will be but I did make them into half-square triangles.  For now, squaring them up will take some time.  I had to buy a new rotating mat to help me.  Gotta have new tools!
Here is a layout I was playing around with.  I kind of like it but I may try some others too.